I am sorry that I have neglected you, yet again. What can I say? I'm just having trouble staying dedicated right now. I will try to be better in the future.
Yours truly, LAL
6.30.2010


5.15.2010
Cinch Skirt
 Another easy project to make you feel all shiny and new for your next night on the town! All you need is about 1 yard of fabric. First, cut a strip off one of the long sides with which you'll make your cinching band. Make the strip about 5 inches wide- you'll fold it over- wrong-side-out, sew it up the long edge and up one end, turn it right side out and then sew up the other end so you have a finished band.
  Alternatively, you could pick ribbon that goes with whatever fabric you pick, and then eliminate this step (even better). Next you'll take your big fabric piece- depending on how long you want the skirt to be, fold it in half lengthwise with the "right" side facing inward, and pin up the long edge. Then sew the edge. Turn the panel right-side-out, and then press the seam you just sewed so that it lands not on the edge, but about 4 inches from the edge. This way when you're wearing the skirt, you won't see the seam at all, it will be hidden up from the bottom of the skirt. Now fold your pressed panel in half, wrong-side-out, and pin the open edges together, and sew a seam there. Now turn right side out- you'll now have a giant circle of fabric. Then cut small slits in even increments across the top of the skirt, about 4 inches down from the top edge- then loop your band or ribbon through the slits in an "in and out" motion.
  Tah dah! You're all finished! Step into the skirt, cinch it up, tie it off, head out the door!
4.25.2010
Flip Your Flops
 In keeping with the tradition of embellishing old clothing/accessories to make something fresh and new for the 'ol wardrobe, I've dressed up these old flip flops from H&M. To do it yourself, all you need is an old pair of flops, needle and thread, some fabric to use for your embellishment, and a safety pin. First, cut 2 pieces of fabric for your embellishment, as well as straps (about 1 inch wide, and as long as you need for it to go around your ankle and tie in a knot).
  The embellishment pieces should be shaped like very long triangles; fold in half, wrong-side-out, and sew up the long edge; turn right-side-out. Press the embellishment pieces so that the seam runs up the middle. On the wide end of the triangle, fold the edge over (toward the seam side) to make about a 1 inch hole through which the ankle strap will go, sew across.
  Then sew up the middle of the embellishment piece with needle and thread with stitches about 1/4 inch apart- then pull to gather. Tie off the thread when the embellishment is gathered enough to make the piece the right length to sit on top of your foot- from the spot on the flip flop where you'll attach it, to your ankle. Then take the gathered embellishment piece and sew it onto the flip flop, seam side down.
  Using a safety pin, lace your ankle strap through the 1 inch hole you've made where the embellishment will meet your ankle.
  Voila- strap 'em on!
4.12.2010
Protesting All Seasoning Packets....
 It's that time of year again- the birds are singing, the flowers are blooming, and fresh produce is making a comeback! What better way to celebrate than by whipping up a batch of glorious guacamole. There's just one thing- when picking up the necessary ingredients, do not, under any circumstances, buy one of those nasty guacamole seasoning packets. I know how it is out there in the grocery stores (sigh....)- they strategically place the seasoning packets right next to the avocados to get you second-guessing yourself, wondering, "I need one of these packets, right?" Wrong! Don't do it! Instead, dazzle your guacamole-sharing friends and family with a dose of all-natural seasonings- the ones that come from the ingredients below:
- 2 Avocados (they should be a bit soft, just so you can press into them an leave a slight dent, but not mushy)
- 1 clove of garlic
- 1 tsb salt
- 1 small tomato (seeds and juice removed) diced
- 1 wedge lime juice
- 2 Tbs. chopped onion (red or yellow)
- 1/4 jalapeno (with half of the seeds removed, or more removed if you like more mild guac) chopped
- 3 Tbs. chopped cilantro
Mix the garlic, salt, onion, cilantro, jalapeno, lime juice, and tomato in a medium-size bowl. Then slice your avocados length-wise, and remove the pit (keep one if you will not be serving the guac right away- you shouldn't wait more than 6 hours or so to serve guac once it's made, but placing one of the reserved pits in the prepared guac will help keep it from turning brown). Then scrape out the flesh of the avocado into the other ingredients and mash with a fork and incorporate well with other ingredients. Trust me, this will taste way better than any batch made with one of the seasoning packets! Serve with tortilla chips and flour tortillas. Guac is also great on top of a burger!
4.09.2010
Dinner for One
 Here's a throw back to my girl Ashley and our low-carb meals we used to make out in California (while we were hiding from the crazies). Ever need to throw together a meal for one? Want to keep it low carb, but yummy? Yea, me too....so here's the Un-burger, with mushrooms and swiss. It's not particularly fancy, but it is super tasty!
  Just chop up some onion, rinse off some button mushrooms, and throw it all into a skillet with a ground beef patty, season it all with salt and pepper, and drizzle a bit of Worcestershire sauce, cover on medium heat for about 4 minutes, flip once, wait 4 more minutes, right at the end, toss on a slice of swiss cheese, and call it a dinner! Eat with a fork instead of a bun, and use sauces like ketchup or sriracha sauce to jazz it up. Just one plate, and just one skillet make for super fast and easy cleanup! (of course, you could do this meal for more than one person, just more food and a bigger skillet- same everything else!)
3.24.2010
Center Peace
 Lately I have been laboring over what to do with the island in our kitchen- it has been a blank canvas for a long time (minus the candle I put on a pitiful plate and tried to pass it off as a centerpiece for a while), and so I have been trying to figure out how to dress it up to fit with our kitchen. For some reason when I think of centerpieces, I always think of old-fashioned, overly flowering arrangements. I knew I wanted something more simplified and modern, so the idea of orchids came to me. I have this really cool glass pedestal bowl that I had no idea what to do with, so it finally came to me to fix it up with the orchids to make a centerpiece that is more permanent (provided that I can keep the orchids alive), yet still made up of living things. I heard Oprah say once that centerpieces should always be made up of real things- fruit, flowers, pine cones, whatever, but something real- not plastic. Now I don't typically put a lot of stock into anything Oprah says, and this statement of hers is an easy one to make for someone with billions of dollars and probably her very own personal centerpiece-maker on the payroll, but for whatever reason, it stuck with me. So here's to putting together something modern looking and made of (mostly) "real" things that can serve as a centerpiece for a long time!
 I used my own glass pedestal bowl, and I bought fake greens and preserved moss at Michael's and used them to line the bowl and to add a giant flash of green. Then I bought 5 orchid plants (from Kroger, mind you, so they were relatively inexpensive) and a bunch of fake curly willows. Where the orchids came clipped to ugly blue posts, I swapped out the posts for the curly willows as I planted the orchids to give them the stability they need to stand up. So I'm at peace now with the large centerpiece I have to dress up our kitchen island- and it should last me a long time, which will make it cost-effective in the long run (again, provided I don't kill the orchids). P.S....learned a very cool trick about how to keep the orchids alive- they need very little water- 3 ice cubes, once a week will do it!
3.16.2010
Gourmet Twist on an Old Classic
 Who doesn't love tomato soup with a grilled cheese sandwich? I know I love that combo, and here's a new, more grown-up take on that old classic! Roasted tomato soup with croutons and Parmesan cheese!
What you need:
- 4 lbs of Roma tomatoes
- 1/3 cup olive oil
- 4 cloves of fresh garlic, minced
- 3 sprigs of fresh rosemary, finely chopped (you can use dried rosemary too- sub 2 tsps)
- sea salt (or regular salt)
- 1 tsp crushed red pepper
- Garlic or seasoned croutons
- Shredded or grated Parmesan cheese
What you need to do:
This first part is the hardest, and the only time consuming part of the whole deal- you need to cut the tomatoes in half, length-wise, and pull out the seeds and juice and discard. Throw the tomatoes, garlic, olive oil, rosemary, a few pinches of seasalt, and red pepper in a bowl and toss together so that the tomatoes are well-coated with the seasonings. Let marinate for about 20 minutes. Then lay the tomatoes (cut open side up) on a rimmed baking sheet. Drizzle remaining oil mixture over the tomatoes. Roast the tomatoes in the oven for about 30 minutes at 350 (until the tomatoes start to get blackened on the bottoms and start wrinkling up like prunes). Remove the tomatoes from the oven and place half of them in a food processor to puree....then dump the pureed tomatoes into a large pot on medium heat; then place the rest of the tomatoes in the food processor and "pulse" until they are just broken up into nice chunky pieces. Then dump the chopped tomatoes into the pureed tomatoes. Simmer on low until you are ready to serve- you may need to add a touch of salt to season. To serve, ladle into bowls and top with a handful of croutons and Parmesan cheese- there you have it! FYI- it's even better a few days later- microwave it and top with croutons and cheese! Enjoy!
3.09.2010
Baby Shower Activity (and Decor and Gift)
 Ok, so as before on this blog, I am going to feature a stolen idea- well, most of it was stolen, I suppose I added the element of it being an activity done at the baby shower, rather than before the shower, but whatevs, it's mostly stolen (yea for originality, right?). Recently at a shower for my friend Jane (the original onesie embellisher) the gals who threw the shower had the great idea to have everyone bring a onesie they had embellished and hang them all on a clothesline at the party- they doubled as a cute decor element and gifts! So I ran with that idea, and for a couple's baby shower we just had for our friends Leah and Kirk, we had a onesie-making station at the party to get everyone involved. Then as people made their own masterpieces, we hung them on the clothesline- adding to the cute baby decor! All you need to copy this fun idea is the following:
- onesies- wash them first (get different sizes so the babe will have some to grow into!)
- an iron
- an ironing board
- double-sided iron-on adhesive
- scrap pieces of fabric
- scissors
I went ahead and ironed the adhesive onto the scrap pieces before the party so that all the guests had to do was cut out their shapes, peel off the adhesive paper, place the shape on the onesie and press with the iron! (as demonstrated here by the lovely Kalyn) 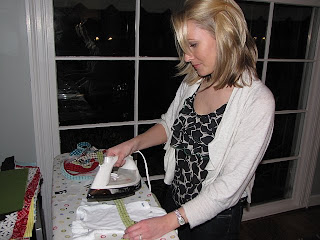 This is such a fun and easy activity and it's a great way to get everyone involved in the party without making them play painful baby shower games! (even the guys got involved with this one!) Have fun!
3.08.2010
Oscar Fashion: Must Weigh In....
Far be it for me to critique the work of famous fashion designers, but I am going to anyway, at least briefly...
 Vera Farmiga in Marchesa- Hated it! Looks like a bunch of fuchsia lily pads or fungus growing up a tree trunk.
 SJP in Chanel- Loved it! But what was she trying to pull off with all of that added hair? Lady, let's be real, it's not even possible for someone to have that much hair attached to their head- if it was, you would have to walk bent over sideways at the waist with a shopping cart next to you in order to carry the weight of the hair.
 Sandra in Marchesa- Loved it, and not another word!
 Rachel McAdams in Elie Saab- Loved it! The way Elia Saab accomplished such sophistication with a print is breath-taking.
 Miley Cyrus in Jenny Packham- Loved it! Hated it at first, but then it grew on me- only wish someone other than a toddler was wearing it.
 Meryl Streep in Chris March- Loved it! Loved Chris March on Project Runway, love Meryl for wearing him on the red carpet.
 Maggie in Dries Van Notten- Not sure- loved the print, but the shape was sort of boooring me!
 Kate Winslet in YSL- Hated it! Don't wear a pant suit to the Oscars.
 Diane Kruger in Chanel- Hated it! Reminds me of the dress the fairy godmothers tried to make Sleeping Beauty when they were still sticking to their whole "let's not use out magic wands" schtick.
 Carey Mulligan in Prada- Loved it! Splendid! Love the length in the front.
 Charlize in Christian Dior- Hated it! Why draw attention to your ta-tas in that manner? Just looks weird.

Amanda Seyfried in Armani Prive- Hated it! Too structured, and too full for me- fabric seems too thick for the shape or something.

Elizabeth Banks in Versace- Loved it!!

Demi in Versace- LOVED it!
Vera Farmiga in Marchesa- Hated it! Looks like a bunch of fuchsia lily pads or fungus growing up a tree trunk. SJP in Chanel- Loved it! But what was she trying to pull off with all of that added hair? Lady, let's be real, it's not even possible for someone to have that much hair attached to their head- if it was, you would have to walk bent over sideways at the waist with a shopping cart next to you in order to carry the weight of the hair. Sandra in Marchesa- Loved it, and not another word! Rachel McAdams in Elie Saab- Loved it! The way Elia Saab accomplished such sophistication with a print is breath-taking. Miley Cyrus in Jenny Packham- Loved it! Hated it at first, but then it grew on me- only wish someone other than a toddler was wearing it. Meryl Streep in Chris March- Loved it! Loved Chris March on Project Runway, love Meryl for wearing him on the red carpet. Maggie in Dries Van Notten- Not sure- loved the print, but the shape was sort of boooring me! Kate Winslet in YSL- Hated it! Don't wear a pant suit to the Oscars. Diane Kruger in Chanel- Hated it! Reminds me of the dress the fairy godmothers tried to make Sleeping Beauty when they were still sticking to their whole "let's not use out magic wands" schtick. Carey Mulligan in Prada- Loved it! Splendid! Love the length in the front. Charlize in Christian Dior- Hated it! Why draw attention to your ta-tas in that manner? Just looks weird.Amanda Seyfried in Armani Prive- Hated it! Too structured, and too full for me- fabric seems too thick for the shape or something.
Elizabeth Banks in Versace- Loved it!!
Demi in Versace- LOVED it!
3.04.2010
Parchment Meals, Revisited
 So I know I've already blogged about this once, but seriously, I cannot get over the amazing-ness of this parchment meal that I recently made. It's from Martha Stewart's Everyday Food magazine, and she made it on the Today Show recently too. Now I know I vowed to be my own person and not just another Martha wannabe, but what can I say? The woman is a genius, or at least she has geniuses working for her, so I just have to share her recipe with you! It's incredible!!!
Ingredients:
1 large mango
2 chicken breasts
1 piece fresh ginger (about 1"), peeled and cut into matchsticks
1/3 cup fresh cilantro leaves
1 medium jalapeno, thinly sliced
salt and pepper
1 tablespoon extra virgin olive oil
Directions:
Heat the oven to 400 degrees. Peel the mango and slice into bite-sized chunks. Divide the mango chunks in half, and place them in the center of 2 large sheets of parchment paper. Top the mangoes with chicken, ginger, jalapenos, and cilantro. Drizzle 1/2 a tablespoon oil over each packet. Sprinkle with salt and pepper. Bring the edges of the parchment up to meet in the middle, and then fold them over, creating a seam. Twist the open edges, sealing the packets shut. Place packets on a cookie sheet and bake for 18-20 minutes. Once they're cooked all the way through, slide the contents of the parchment packets onto plates and ta dahhh! YUMMO!
2.22.2010
Fashion, Fashion, Fashion!
 So the Fall 2010 New York Fashion Week has just wrapped up and every season at this time I scour the Internet to see what came down the runways to fill my fashion-curious brain. I've always had a bit of a time finding a good site, full of all of the goods, but I just saw a commercial for Full Frontal Fashion which is a Sundance Channel website that features everything fashion! This site is very comprehensive and is full of photos, videos, and articles that will catch you up on what is coming from designers next season. Check it out!
For a more focused view of what is happening in the fashion world, also see my friend Cara's blog, Bangs 'n' Cupcakes, for her fav pieces, which are always amazing! She has incredible taste!
Magnolia Bakery Gloriousness
 Ok, so I have these terrific friends here in Nashville who always make Magnolia bakery cupcakes for people's birthdays- they are so delish! So I always thought that the Magnolia Bakery cupcake recipe was super secret, since there was so much hype around them, and since they're so good. Turns out the recipe is all over the Internet, which is great, cause now I make them for friends' birthdays, and everyone loves them! So I thought I'd share the recipe here so that you all can make them for someone's special occasion! Tell them they're the Magnolia Bakery's cupcake recipe and your friend will feel really special and happy you made them for her.
Word to the wise- DO NOT SUBSTITUTE any of the ingredients. I thought I could get away with using all purpose flour in place of the self-rising flour- NO DICE! My poor friend Leah, who's birthday was last week, suffered the consequences (ok, so it's not like they're terrible if you use only all purpose flour, but they are so much better if you follow the recipe exactly!).
Cupcakes:
- 1 1/2 cups self-rising flour
- 1 1/4 cups all-purpose flour
- 1 cup (2 sticks) unsalted butter, softened
- 2 cups sugar
- 4 large eggs, at room temperature
- 1 cup milk
- 1 teaspoon vanilla extract
Preheat oven to 350 degrees. Line two 12-cup muffin tins with cupcake papers. Combine the flours in a small bowl and set aside. Cream the butter until smooth in a large bowl, using the medium speed of an electric mixer. Add the sugar gradually and beat until fluffy, about 3 minutes. Add the eggs, one at a time, beating well after each addition. Add the dry ingredients in three parts, alternating with the milk and vanilla. With each addition, beat until the ingredients are incorporated but do not overbeat. Using a rubber spatula, scrape down the batter in the bowl to make sure the ingredients are well blended. Carefully spoon the batter into the cupcake liners, filling them about three-quarters full. Bake for 20–25 minutes, or until a cake tester inserted in the center of the cupcake comes out clean. Cool the cupcakes in the tins for 15 minutes. Remove from the tins and cool completely on a wire rack before icing.
Icing:
- 1 cup (2 sticks) unsalted butter, softened
- 6 to 8 cups confectioners’ sugar
- 1/2 cup milk
- 2 teaspoons vanilla extract
Place the butter in a large mixing bowl. Add 4 cups of the sugar and then the milk and vanilla. On the medium speed of an electric mixer, beat until smooth and creamy, about 3-5 minutes. Gradually add the remaining sugar, 1 cup at a time, beating well after each addition (about 2 minutes), until the icing is thick enough to be of good spreading consistency. You may not need to add all of the sugar. If desired, add a few drops of food coloring and mix thoroughly. (Use and store the icing at room temperature because icing will set if chilled.) Icing can be stored in an airtight container for up to 3 days.
2.17.2010
New Year's Smezalution...
When the year turns, everyone starts talking about resolutions- go to the gym, eat healthier, blah, blah, blah. Well I say, "New Year's Resolution, New Year's Smezolution!" And I also agree with the experts on weight loss and eating healthy, diets are a joke- for me (trying to lose baby weight), what works is picking some fav food options that you can make on at least a semi-regular basis....oh, and they have to be healthy food options that taste AWESOME (so that you'll actually want to eat them more than once in your life). Thought I'd share a couple that are DELISH and super easy considering how good they taste!
The BEST Caesar Salad Recipe.....

Don't be discouraged- I know this looks like a lot of ingredients, but after you buy them once, you'll have them at home for when you want to make this amazing dressing (guests are always amazed when you serve this dressing and then you tell them you made it from scratch!)
Put all of the following into a food processor or blender and puree together:- 3 cloves garlic (minced)
- 1 tbsp anchovy paste (I know this sounds gross, but it gives that real Caesar salad taste, so don't skip it)
- 1 tsp lemon juice
- 1 tbsp Worcestershire sauce
- 1/4 tsp pepper
- 1/4 tsp hot sauce (such as Tabasco)
- 1 large egg (nuke it in the microwave for 8 seconds- enough to zap any salmonella, but not long enough to cook it)
- 1/4 tsp mustard powder
- 1 tbsp red wine vinegar
After these ingredients are pureed together, gradually drizzle in 1/4 cup olive oil while the processor or blender is running to emulsify the oil into the rest of the ingredients. Toss the dressing over 2 bunches of romaine lettuce and toss in 1/2 cup of grated Parmesan cheese (have more for topping too), and 1.5 cups of croutons. Add some grilled shrimp, chicken or salmon and you have yourself a delish homemade dinner that is filling but easy on the waist line!
The "I have all of this random food, and don't know what to make with it" Recipe:
The solution= dump some tasty vinaigrette on it all and roast it up! This is another option that can work out on a regular basis and can be super healthy. Last night I found myself with no plan for dinner, but with a bunch of random veggies and some chicken breasts and no idea what to do with them. So I decided to toss them in an easy vinaigrette dressing and roast them in the oven. I had cherry tomatoes and chicken- so I whisked together about 3 tbsp olive oil, 2 tbsp balsamic vinegar, and 1 tbsp Dijon mustard (eyeball all of these and season to taste- toss some fresh cracked pepped in too), tossed the tomatoes and the chicken in the dressing, dumped them on a rimmed baking sheet and popped them in the oven on 350 for 25 minutes. At the last minute, I laid a slice of Swiss cheese on top of the chicken breasts to let it melt in the oven. I whipped up a box of whole grain rice mix (such as Near East brand), popped some of the whole grains on the plate and topped with a chicken breast and some of the tomatoes, and called it a dinner. It was really good too! You could do this with just about any random set of veggies you have left over in the fridge, such as carrots, squash, zucchini, bell peppers. Be creative and enjoy!
Arrested For Neglect
Well, I wasn't but I should be...I was so excited about this blog when I started it, and look what has become of it! So disappointed with myself...to my credit, I did have a baby, but last night he slept from 9pm to 6:30am, so I find myself with the energy to get going here again! It might be a tall order to ask you all to come back around and start reading again, but please do! I promise, I'm in it now for real!
9.23.2009
Not to get all "baby stuff" on you, but.....


 Well, since I have a bun in the oven, everything around our house has sorta of gone baby on us...I mean, there is an actual crib in our house- WHAO! So exciting! So of course I had to get all hyped up about making the baby's bedding.....at first I thought, "ugh, this is going to be much too much of a hassle, I should just buy something." Well so then I started looking around on websites, and instantly became obsessed with Serena & Lily - their 3 piece crib bedding sets are adorable! Great fabrics, so cute, etc., etc. Well, the not so cute thing about them is the price- like seriously, $580 for crib bedding? You've got to be kidding me! So that wasn't gonna happen.....and since I have this lovely fabric store here in Nashville, Textile, which carries THE CUTEST fabrics, I knew that if I could figure out how to make the stuff, I'd have something just as adorable as Serena & Lily for at least 1/2 the price. TA DAAAA! This stuff was way easier to make than I anticipated- don't get me wrong, it's a big project, and you have to be ready to spend some time on it, but I am so happy that I went for it, and I know all of you over-zealous, (and especially first-time), expectant gals out there can do it too! I'm not going to get in the nitty-gritty step-by-step on this stuff, but I want to generally share how I made all of this.....so take a look at the pics below....
You'll need 8 pieces of fabric to make the body of your bumpers- 2 pieces for each bumper. You'll also need any piping and other trim that you want to use to embellish the style of the bumpers. Finally, you'll need something that will serve as the ties that will attach to the crib itself. Here I made my own ties to match the fabric I bought, but you can also use any ribbon you like. For each bumper, I put one tie on each of the four corners, and then 2 set of ties on the top and bottom of the long bumper as well. This way you'll use the corner ties from adjacent bumpers to tie onto the crib posts. 

Once you have all of your pieces ready to go, you need to assemble the bumpers from the inside out. So lay one of your pieces of fabric down, right-side-up, then start to place all of the other pieces where they need to go. Any piping or trim you're using will lay with the rough edges lined up with the top of the pieces of main fabric. Same goes for the tie pieces- they will all be placed so that the ends of the ties that will go around the crib bars will be in the middle of the body piece of fabric and the rough ends will be placed right on the edges of all four corners (and in the case of your long bumpers that run the longest length of the crib, you'll need a set of 2 ties on top and bottom to tie around the middle bars of the crib). Once you have all of the pieces situated like so, lay the other piece of body fabric right-side-down on top of everything else, then pin together. Then you're ready to sew it up. Sew all around all four sides, leaving only about a 6-8 inch opening on the bottom edge of each bumper so that you can stuff them. Once you have it sewn up leaving the stuffing hole, turn the bumpers right-side-out. Then stuff!  Finally, sew up the 6-8 inch stuffing hole by folding the edges inward and pinning in place. Tip- if you've chosen to use any piping or trim, use a zipper foot to sew around those sides, which makes the machine work easier. Good luck!

9.16.2009
Baby Shower Favors
 I recently co-hosted a baby shower for one of my friends, and straight off I volunteered for favor-making duties- I just love this kind of stuff, so I snatched up that responsibility right away. I wanted to make something that the gals would take home and actually use...now, I'm a big bath person, so this sounded especially great to me. I just rounded up the following materials and put together little bath salt favors with a cute baby theme!

- Unscented bath salts as well as scented bath salts (pick your fav scent, and check Marshalls or TJ Maxx for really great deals on giant jugs of this stuff- I mixed the two together as the scented ones were a bit overwhelming, so I toned them down with the unscented)
- Glass apothecary jars of various shapes and sizes from Hobby Lobby or Michaels
- Ribbon of your choice (here I used blue in honor of the soon-to-be-born baby boy)
- Plain round white stickers (found these at Office Depot, seriously think they're meant to be yard sale price tags!)
- Stamps of your choice
- Ink pad in color of your choice
So I just mixed the bath salts together to make a lovely smelling mixture, then I filled each of the glass jars with the salts. I finished off the cute favors by gluing a piece of ribbon around the jar (hot glue gun works best), placing a white sticker where the ribbon ends came together, and then stamping the sticker with something cute and fun. That's it! This is an easy way to make super cute favors- perfect for baby showers, wedding showers, birthdays, or any special occasion where you'd like the ladies to leave with something lovely! Have fun!
Chicken Tortilla Soup: Yumm-O!!
 Ok, I have made some version of this soup many times before, just tossing in this and that spice here and there in various measurements, but this time it turned out so delish, I had to share! Try it out for a nice fall soup as the nights start to cool off a bit!
Ingredients:
- 3 Tbsp olive oil
- 2 boneless, skinless chicken breasts, diced
- 1/2 of a jalepeno, finely chopped
- 1/2 of a yellow onion, diced
- 1 Tbsp Cumin powder
- 2 cloves garlic, crushed
- 1 Tbsp salt, plus more for seasoning to taste
- 1/4 Tsp Cheyenne pepper
- 1 Tsp Chili powder
- 1 15 oz. can chicken broth
- 4 Tbsp flour
- 3 cups milk
- 1 baking potato, peeled and diced
- 2 ears corn, shucked, and kernels cut off the cob
- 1/2 cup shredded mexican cheese mix, plus more for garnish
- Tortilla strips for garnish
- Diced tomato for garnish
What to do:
Place the oil, chicken, jalepeno, garlic, onion, and all spices in a large soup pot; cook the ingredients until chicken has turned white and cooked almost all the way through. Stir in about a 1/4 cup of the chicken broth; then stir in the flour to form a paste; stir in the rest of the chicken broth and then the milk; stir very well and bring to a boil, stirring constantly; then reduce heat to low. Stir in the potato and corn; simmer for about 10 minutes, then stir in the cheese. Cover and leave to simmer on very low heat for about 20 minutes, or until the potatoes are soft and easily break with the poke of a fork. Stir frequently as to not allow the soup to burn on the bottom. Taste before serving- if it's too bland, add salt until it tastes delicious. Serve with tortilla strips, diced tomato, and shredded cheese on top. Enjoy!
9.05.2009
Dork Alert!
Ok, I know that it is completely not normal for a 28 year old gal to get this excited about something so mundane, but check this out, I just found the most amazing way to get furniture indentations out of carpet! Yep, that's right, that's actually what I'm sitting here typing this post about at 9:13 on a Saturday morning- furniture indentations!
So we're shuffling rooms in our house all around to make way for the baby- selling furniture, moving furniture, etc., etc.....needless to say, we have LOTS of furniture indentations left in the wake of all of this moving, and they drive me NUTS! So I was reading online about how to get rid of these pests, and the method that looked easiest to me was the one I tried first- putting an ice cube on the indentation and then let it melt and then fluff it up- NOPE, don't even bother, totally doesn't work. I figured heat needed to be involved somehow, so I thought about trying out the 'ol clothes steamer we got for our wedding- OH MY GOSH, I can't even tell you how delighted I am with the results- it's like brand new carpet. Our steamer has a flat attachment to use on garments, so I took that off so that the little spout would pour out more concentrated amounts of steam rather than spreading it out. Worked like a charm- you just hold the steamer over the indentation and I could literally see the fibers rising before my eyes! Unbelievable- super fast, super easy, and if you don't have a steamer, seriously come borrow ours- it'll be worth the trip!
9.04.2009
Heidi, Tim, are you Paying Attention?
 Ok, so this post has absolutely nothing to do with the purpose of this blog, so I'm sure I'm breaking the number one rule of blogging by putting it up here, but I can't help it. I'm just so proud and secretly hoping to get discovered- I couldn't resist showing you all this dress!
 My friend Cami got married a couple weeks ago and a while back we were talking about dress making and what not, and she said, "oh my gosh, why don't you make me a dress for me to wear out after our wedding?" Well of course I was just so flattered that anyone would want to wear one of my creations, so I jumped at the opportunity. We went fabric shopping immediately and we were so thrilled with what we found (this Prada fabric) that Cami insisted that this be her rehearsal dinner dress instead! So we talked through the design together, and this is what came out of it. I say that it has nothing to do with the purpose of this blog because it wasn't inexpensive or easy to make, but again, I'm just too proud to keep it to myself! Hopefully the producers of Project Runway are crawling the Internet and find this post!
 I learned so much making this dress- I have no formal training in sewing, and I mean, this thing is fully lined, has interfacing, and boning! I had no idea how to do any of that before I made this dress so I'm so excited to have the experience under my belt now! (Big thanks to Muna, who helped out extraordinarily!!) My favorite part of the dress is the bustle I put into the back (in this picture, it looks a bit messy, but in real life it's so cute!) Whew, think it turned out pretty great! Oh, and I made the little matching bow tie for her husband, Wes, too- how cute is that? Hope you all like it! And congrats to the happy couple!!!
 8.05.2009
Froof-er-ize Your Life
First off, I must apologize for neglecting my creative duties for so long....I'm sure I've lost most of my followers as a result, and I don't blame you- hopefully you'll all come back to me and I'll keep adding new posts!

Ok, now down to business.....so, I made this dress recently and am just OBSESSED with the one-shouldered froof I attached to give it some glam! As I was making it, I was thinking to myself, "wait a sec, I could add one of these cool froof things to any old washed up boring strapless dress and make it like new again." For instance, I have this old JCrew strapless black dress- it's cute, but boring, and old, so it needs something fresh to bring it back to life, and a froof like the one seen here would do just the trick! Making the froof is easy, and easy to work onto any strapless dress.
What you'll need to do is buy a big piece of fabric (preferably something sort of stiff and crunchy like the froof I made here, so that the ruffles will stand up on their own); fold it diagonally to make a triangle. The triangle, from tip to tip, needs to be at least twice as long as the distance from under one armpit, over the top of your other shoulder, and back around your back, ending at the same armpit. Then cut along the fold, cutting sort of a semi-circle shape so that the ends, which will attached under your one arm, are skinnier than the middle, which will sit on top of your other shoulder. Then sew up the open side, and then turn inside out. Then grab a needle and thread and loosely make stitches along the seem, so that once you get thread through the length of the seem, you'll pull it gently, bunching the fabric to make ruffles. Once you make the ruffles, make sure the froof is the right length to go from under one arm, up over your shoulder, around your back, and back to the first armpit. Then this next part is where your creative license comes in- just grab a needle and thread and start bunching the fabric together in random spots and making a stitch here and there and tying it off. This will make you one nice, long froof.
 Then you simply attach the froof, beginning under the first armpit, securing it to your dress, also tack it on a few places on the front of the dress, only about right to between your cleeve, and then leave enough loose fabric that it will comfortably go up over your shoulder, and then start attaching again at about the middle of the back of the dress, and then a few more stitches, ending again under the first armpit.
This is a super simple and cheap way to completely reinvent an old strapless dress- the one shouldered stuff is really in these days, and this simple froof addition really adds MAJOR GLAM to an otherwise boring old dress! Good luck!
Subscribe to:
Posts (Atom)
