Showing posts with label Gourmet Cooking Tips. Show all posts

3.16.2010

Gourmet Twist on an Old Classic

Who doesn't love tomato soup with a grilled cheese sandwich? I know I love that combo, and here's a new, more grown-up take on that old classic! Roasted tomato soup with croutons and Parmesan cheese!

What you need:
  • 4 lbs of Roma tomatoes
  • 1/3 cup olive oil
  • 4 cloves of fresh garlic, minced
  • 3 sprigs of fresh rosemary, finely chopped (you can use dried rosemary too- sub 2 tsps)
  • sea salt (or regular salt)
  • 1 tsp crushed red pepper
  • Garlic or seasoned croutons
  • Shredded or grated Parmesan cheese

What you need to do:

This first part is the hardest, and the only time consuming part of the whole deal- you need to cut the tomatoes in half, length-wise, and pull out the seeds and juice and discard. Throw the tomatoes, garlic, olive oil, rosemary, a few pinches of seasalt, and red pepper in a bowl and toss together so that the tomatoes are well-coated with the seasonings. Let marinate for about 20 minutes. Then lay the tomatoes (cut open side up) on a rimmed baking sheet. Drizzle remaining oil mixture over the tomatoes. Roast the tomatoes in the oven for about 30 minutes at 350 (until the tomatoes start to get blackened on the bottoms and start wrinkling up like prunes). Remove the tomatoes from the oven and place half of them in a food processor to puree....then dump the pureed tomatoes into a large pot on medium heat; then place the rest of the tomatoes in the food processor and "pulse" until they are just broken up into nice chunky pieces. Then dump the chopped tomatoes into the pureed tomatoes. Simmer on low until you are ready to serve- you may need to add a touch of salt to season. To serve, ladle into bowls and top with a handful of croutons and Parmesan cheese- there you have it! FYI- it's even better a few days later- microwave it and top with croutons and cheese! Enjoy!

2.17.2010

New Year's Smezalution...

When the year turns, everyone starts talking about resolutions- go to the gym, eat healthier, blah, blah, blah. Well I say, "New Year's Resolution, New Year's Smezolution!" And I also agree with the experts on weight loss and eating healthy, diets are a joke- for me (trying to lose baby weight), what works is picking some fav food options that you can make on at least a semi-regular basis....oh, and they have to be healthy food options that taste AWESOME (so that you'll actually want to eat them more than once in your life). Thought I'd share a couple that are DELISH and super easy considering how good they taste!

The BEST Caesar Salad Recipe.....

Don't be discouraged- I know this looks like a lot of ingredients, but after you buy them once, you'll have them at home for when you want to make this amazing dressing (guests are always amazed when you serve this dressing and then you tell them you made it from scratch!)

Put all of the following into a food processor or blender and puree together:

  • 3 cloves garlic (minced)
  • 1 tbsp anchovy paste (I know this sounds gross, but it gives that real Caesar salad taste, so don't skip it)
  • 1 tsp lemon juice
  • 1 tbsp Worcestershire sauce
  • 1/4 tsp pepper
  • 1/4 tsp hot sauce (such as Tabasco)
  • 1 large egg (nuke it in the microwave for 8 seconds- enough to zap any salmonella, but not long enough to cook it)
  • 1/4 tsp mustard powder
  • 1 tbsp red wine vinegar
After these ingredients are pureed together, gradually drizzle in 1/4 cup olive oil while the processor or blender is running to emulsify the oil into the rest of the ingredients. Toss the dressing over 2 bunches of romaine lettuce and toss in 1/2 cup of grated Parmesan cheese (have more for topping too), and 1.5 cups of croutons. Add some grilled shrimp, chicken or salmon and you have yourself a delish homemade dinner that is filling but easy on the waist line!

The "I have all of this random food, and don't know what to make with it" Recipe:

The solution= dump some tasty vinaigrette on it all and roast it up! This is another option that can work out on a regular basis and can be super healthy. Last night I found myself with no plan for dinner, but with a bunch of random veggies and some chicken breasts and no idea what to do with them. So I decided to toss them in an easy vinaigrette dressing and roast them in the oven. I had cherry tomatoes and chicken- so I whisked together about 3 tbsp olive oil, 2 tbsp balsamic vinegar, and 1 tbsp Dijon mustard (eyeball all of these and season to taste- toss some fresh cracked pepped in too), tossed the tomatoes and the chicken in the dressing, dumped them on a rimmed baking sheet and popped them in the oven on 350 for 25 minutes. At the last minute, I laid a slice of Swiss cheese on top of the chicken breasts to let it melt in the oven. I whipped up a box of whole grain rice mix (such as Near East brand), popped some of the whole grains on the plate and topped with a chicken breast and some of the tomatoes, and called it a dinner. It was really good too! You could do this with just about any random set of veggies you have left over in the fridge, such as carrots, squash, zucchini, bell peppers. Be creative and enjoy!

9.16.2009

Chicken Tortilla Soup: Yumm-O!!

Ok, I have made some version of this soup many times before, just tossing in this and that spice here and there in various measurements, but this time it turned out so delish, I had to share! Try it out for a nice fall soup as the nights start to cool off a bit!

Ingredients:
  • 3 Tbsp olive oil
  • 2 boneless, skinless chicken breasts, diced
  • 1/2 of a jalepeno, finely chopped
  • 1/2 of a yellow onion, diced
  • 1 Tbsp Cumin powder
  • 2 cloves garlic, crushed
  • 1 Tbsp salt, plus more for seasoning to taste
  • 1/4 Tsp Cheyenne pepper
  • 1 Tsp Chili powder
  • 1 15 oz. can chicken broth
  • 4 Tbsp flour
  • 3 cups milk
  • 1 baking potato, peeled and diced
  • 2 ears corn, shucked, and kernels cut off the cob
  • 1/2 cup shredded mexican cheese mix, plus more for garnish
  • Tortilla strips for garnish
  • Diced tomato for garnish

What to do:

Place the oil, chicken, jalepeno, garlic, onion, and all spices in a large soup pot; cook the ingredients until chicken has turned white and cooked almost all the way through. Stir in about a 1/4 cup of the chicken broth; then stir in the flour to form a paste; stir in the rest of the chicken broth and then the milk; stir very well and bring to a boil, stirring constantly; then reduce heat to low. Stir in the potato and corn; simmer for about 10 minutes, then stir in the cheese. Cover and leave to simmer on very low heat for about 20 minutes, or until the potatoes are soft and easily break with the poke of a fork. Stir frequently as to not allow the soup to burn on the bottom. Taste before serving- if it's too bland, add salt until it tastes delicious. Serve with tortilla strips, diced tomato, and shredded cheese on top. Enjoy!

5.21.2009

Overly Domesticated

Ok, I almost hate to admit it, but yes, I just made a chicken pot pie from scratch (and yes, I can hear the derogatory 1950's "how to be a good housewife" quotes streaming through my head now), but I'm really proud of this one, and wanted to share. My hubby loves chicken pot pies, so to be nice, one day I just threw together what I thought would be in one, and I just went for it. It turned out pretty well, so I have made them a couple times since. Now the reason for this post is that I found myself without a key ingredient, and so I had to improvise. It might be jumping the gun a bit to brag about this solution already, since the pie has yet to be consumed, but I'm confident it will turn out great!

So I was missing a pie crust- an obvious essential of chicken pot PIE; and rather than being SEVERELY overly domesticated and making a pie crust from scratch, I scrapped the bottom layer crust (don't need the extra carbs anyway) and replaced the top crust with croutons! They're garlic cheddar flavor too, so I'm thinking they'll add a little pizazz to the dish.

So here's what you'll need to make the whole thing, start to finish:

  • 2 boneless, skinless chicken breasts, diced
  • 1 cup chopped onion
  • 4 cloves minced garlic
  • 1 1/4 cup chicken broth
  • 2 tbs flour
  • 2 tbs fresh chopped rosemary and thyme
  • 1 cup frozen mixed veggies (carrots, green beans, corn- all come in the bag together)
  • 1 tsp salt
  • 1 bag croutons
Heat a medium skillet over medium heat, add chicken, onion and garlic with about 1/4 cup of the chicken broth; saute until the chicken is cooked through; whisk in the flour to form a paste, then add the rest of the chicken broth, the herbs, the veggies, and then salt. Simmer for about 10 minutes until the mixture has thickened up (add a bit more broth if it gets too thick- it should be about the consistency of your favorite hearty chili).

Pour the mix into a pie dish, then sprinkle the croutons on top to form a crust. Cover and let sit for at least 2 hours- this will give the croutons a chance to soak up the moisture from the mix. Then bake, covered, at 375 for about 25 minutes- take off the foil for the last 5 minutes to give the croutons a chance to get crusty again. You can make this ahead and refrigerate after putting the croutons on- this will add to your cook time though, as the dish will be colder to begin with. Bottom line, just keep an eye on it- it should bubble up through the croutons a bit, letting you know it's nice and hot!

5.20.2009

Parchment Meals


Ok, this is a trick I learned eating out at restaurants and reading cookbooks. Parchment paper meals are super easy and delish, and make for next-to-nothing clean up. You can cook pretty much anything this way, and the pouch you make out of the parchment paper allows the food inside to steam up very nicely- with all ingredients blending as they cook.

One idea is a type of Greek meal (seen above from Everyday Food Magazine)- lay out a large piece of parchment paper on the counter, and toss on a chicken breast, some artichoke hearts (chopped), some red onion, kalamata olives, and tomatoes- top it off with a drizzle of olive oil, salt and pepper and feta cheese, fold up the sides, and crimp them together so the pouch remains closed. Set the pouch in a baking dish with sides (so that if any of the juices run out, they'll be caught and not dirty up the oven), place in the oven- preheated to about 375, and let cook for about 25 minutes. Depending on your oven, it may take longer, but feel free to check it after about 20 minutes to see how the chicken is doing- you be the judge on time. Once the chicken is finished, just empty the pouch onto your plate and eat up!

Seriously, you can cook any meal you dream up this way; some other ideas are:
  • Tuna steak with chopped jalapeno, soy sauce, chopped fresh ginger, garlic and snow peas;

  • Any kind of white fish with julienne veggies (onions, carrots, celery)- maybe some rosemary and thyme sprinkled on top

  • Mexican flare- chicken breast with sliced bell peppers and onions, chopped jalapeno, and sprinkle generously with garlic salt, chili powder, and cumin powder- top off with cilantro and sour cream when it's finished
Enjoy!

2.16.2009

It Ain't No Secret, Folks...

....Cedar plank-smoked salmon is fabulouso!!! Ok, I'm not gonna lie and say it's like this super easy thing to make for dinner; however, it is super delish, and definitely a crowd pleaser (oh, and it's very healthy!). So here's what you do- get yourself a cedar plank, such as Fire & Flavor brand, or any other at your fav grocery store- soak it in water for at least 2 hours- it must be completely submerged for the entire time. Also, pick up a lemon, slice it very thinly, and a bunch or fresh rosemary. And of course, the salmon!

Heat your grill on high heat for about 10 minutes. In the meantime, coat the top side of the cedar plank with some olive oil, sprinkle with salt and pepper. Place the cedar plank on the grill, and allow it to warm up in the grill for about 7 minutes. Then, place the lemons in a single layer, covering the plank, then place the rosemary sprigs on top (6 sprigs should be sufficient). Then, after seasoning the salmon with salt and pepper, place them on top of the lemon and rosemary-clad cedar plank. Close the grill lid and leave it closed for at least 12 minutes (opening it to check the fish frequently will only make it take longer to cook). After 12 minutes, check the fish- it will be flaky when it's finished- every piece of fish will be different in terms of size, and therefore the cooking time will be different too. Once the fish is cooked, remove it from the grill (have a bucket of cold water standing by for the cedar plank to be plunged into as it might be on fire at this point).


The cedar plank-smoked salmon is great to serve on top of Toasted Pine Nut Couscous (Near East brand)! And then, for the finishing touch, roast some jewel vegetables, such as zucchini, red onion, and grape tomatoes tossed in olive oil, balsamic, and salt and pepper on a cookie sheet in the oven at about 350 for 20 minutes. This dish looks beautiful, it's healthy, so delicious, and it costs about $14! Enjoy!

2.04.2009

Basket Weaving With Cheese?


Well, ok, so it's not exactly weaving, but it is basket making with parmesan cheese! Let me tell you, if you want to impress some people for a nice dinner or fun occasion, this trick is great and it can be used in so many different ways! A good friend of mine who spent a semester in Italy in culinary school taught me this, and I've used it countless times since.....here's what you'll need
  • A non-stick skillet
  • Shredded parmesan cheese (tip: the longer the shreds, the better, and don't use Kirkland brand (from Costco) parmesan, it's the only kind I've tried that doesn't work; try Kraft or any other store-packaged shredded parm- should work great)
  • A very thin spatula or cake-icing utensil
  • A jar of spices or some other container you have around the kitchen

Here goes....

Heat the skillet to medium; sprinkle the parm shreds in a circle as big as you would like (it seems that 6-8 in diameter inches or so works well).

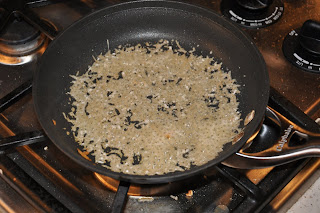
Once the parm is golden brown, loosen one side of the edges, slip the spatula or other utensil under the edge, and flip over. I find it helpful to slip the spatula under, and before flipping it, place a couple fingers on top of the parm to make sure it doesn't slip off the spatula- plus, using two hands will help guide the parm onto its other side in the middle of the skillet.

Finally, let that side brown for about 20 seconds or so....don't let it stay there long enough to start burning. Then, slip the parm onto the spatula again and place it over a spice jar or other container, depending on the shape you want it to take. Once you place it over the container, the sides of the parm will start to fall down to form an upside down basket. Leave the basket on the container for about 5 minutes at least, to let it harden.


Once it is hardened, use it in any way you like. I love to make risotto and present it in the parm basket- it's also great for Caesar salads. You can really make any shape you feel like and use it in so many different ways! Enjoy!