Stitch-Witchery! Man, gotta love this stuff.....ok, so even though we only finished decorating one of our bathrooms about a year ago, we're already saying to ourselves, "what on earth were we thinking with those colors?" So, it's time for a change- and what better way to make a dramatic change to a bathroom than with a new window treatment? I mean, with the invention of stitch-witchery, it couldn't be easier- no sewing machine needed.....all you have to do is find a piece of fabric you like (light weight fabrics will work best with the stitch-witchery), cut it to about 1 and a half times the width of your window, and to whatever length you wish (full window-length, or you can do a cafe curtain as we did here- this saves time and money, and lets the light in!)- leave about an inch extra on all sides for the hem, add lining if you want to (cheap muslin fabric works great!), and grab the iron! If you're hanging a window treatment for the first time in this particular room, you'll also need the curtain rod, rings, and drapery hooks. I know this sounds like a lot, but if you initially pick a versatile curtain rod, such as the black one here, you can change up the fabric every year at very little expense- this is so fun because you get to recreate the look of a room, and you can do it often, and inexpensively! Here's what you do:

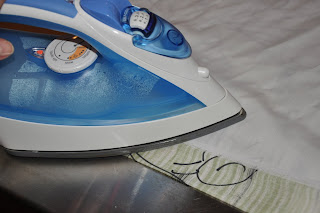
- Press on top of the lining with the iron on its highest temperature- press hard for a for a good amount of time (about 10 seconds) in each spot to make sure the bond takes hold
- Repeat on all four edges
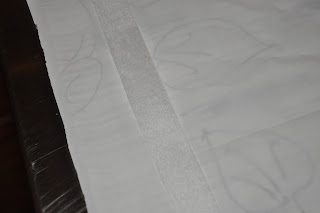
Then you'll place a strip of stitch-witchery along the edge on top of the lining, about an inch inside the edge; and fold the side up so that the stitch-witchery is covered, and press with the iron


- Repeat with the opposite edge
- Then to finish the final two sides, lay a strip of stitch-witchery along the edge, just like in the last step
Before pressing, start with one corner by folding it in at at 45 degree angle so as to create a finished edge; press this corner
- Then move to the other corner and make the 45 degree-angle fold, and press- continue pressing the entire length of that edge between the two corners
- Repeat with the final edge

Ta-Da!!- new window treatment, sans sewing machine, and in about 20 minutes! It's important to know that stitch-witchery obviously isn't going to hold as well as if the hems were sewn, but it is super fast, super easy, and if you're like me, and sick of decorations really, fast, this will do just fine until you move on to your next window treatment!
 Stitch-Witchery! Man, gotta love this stuff.....ok, so even though we only finished decorating one of our bathrooms about a year ago, we're already saying to ourselves, "what on earth were we thinking with those colors?" So, it's time for a change- and what better way to make a dramatic change to a bathroom than with a new window treatment? I mean, with the invention of stitch-witchery, it couldn't be easier- no sewing machine needed.....all you have to do is find a piece of fabric you like (light weight fabrics will work best with the stitch-witchery), cut it to about 1 and a half times the width of your window, and to whatever length you wish (full window-length, or you can do a cafe curtain as we did here- this saves time and money, and lets the light in!)- leave about an inch extra on all sides for the hem, add lining if you want to (cheap muslin fabric works great!), and grab the iron! If you're hanging a window treatment for the first time in this particular room, you'll also need the curtain rod, rings, and drapery hooks. I know this sounds like a lot, but if you initially pick a versatile curtain rod, such as the black one here, you can change up the fabric every year at very little expense- this is so fun because you get to recreate the look of a room, and you can do it often, and inexpensively! Here's what you do:


 Ta-Da!!- new window treatment, sans sewing machine, and in about 20 minutes! It's important to know that stitch-witchery obviously isn't going to hold as well as if the hems were sewn, but it is super fast, super easy, and if you're like me, and sick of decorations really, fast, this will do just fine until you move on to your next window treatment!
No comments:
Post a Comment